Managing player's photos, league's/competition' and Team's logos
This article will guide on how to add, edit visual info of the league:
1. Logo of the organization/league
2. Logo of the league/competition
3. Logo of the team
4. Photos of the players
Requirements for photos and logos which are uploaded to FIBA Organizer are the following:
- size should not exceed 512 Kb and 600x600 pix, the absolute minimum - 75x75 pix
- file formats JPG or PNG. It is recommended to use PNG format for logos
- marginal ratio 1:1 for all images.
 It is very important! To update team logo or player photo for the current season, make sure the season is set as current in FIBA Organizer (FO). Support article is here.
In order to achieve the desired, it is good to know there are differences in terms in different Genius Sports tools:
FIBA Organizer | Data Manager & Hosted Solution | ||
1 | Account LOGO | = | League LOGO |
2 | League LOGO | = | Competition LOGO |
One of these 2 logos will appear:
- in the Game Center in the top-left corner. Account/League logo will be displayed until a logo of a League/ Competition is added (as it is described in the points #1 and #2 accordingly).

- in Hosted Solution on the top of the page, if any logo will be selected, as it is described in the article here (paragraph General Setup > points #6 & #7)

1. Logo of FO account (= Logo of the League in other GS tools)
Go to tab Configurations > Settings and scroll down ->
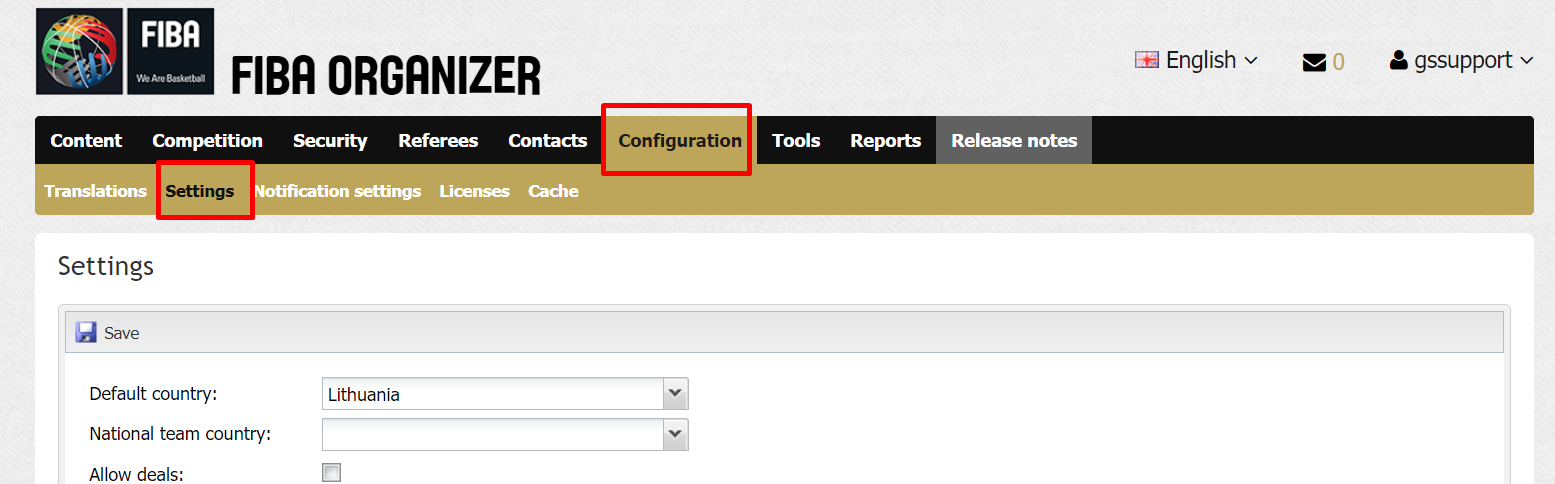
-> add a logo and click Save.

2. Logo of the League in FO (= Logo of competition in other GS tools)
Go to tab Competitions, find the respective league/competition, add logo under Edit League

3. Logo of the team
Go to tab Teams, find the respective team, select it and click Edit button. Go to tab General info.

 Note. If a team is taking part in more than one competition in the same current season, you should add team's logo in each of them. Competitions of the Current season always will be bolded on the left side of the window.
4. Photo of the player
There are 2 methods to add players' photos:
A1. Editing personal info via Roster tab
Go to tab Teams, find the respective team, select it and click Edit button. Go to tab Roster, select player, click Edit personal info button.

Add a photo and click Save.

A2. Editing personal info via Personnel tab
The other option for adding of players' photos is placed under tab Personnel, but it is not so handily as you need to search for every player separately.
Search for the player, select the row and click Edit button.

Add a photo and click Save.

Technically both sub-options of version A are the same. In these cases photo of the player will be assign to his/her ID through all the competitions, until any photo is added to this player's profile as a headshot (described further in the point #B).
B. Editing person headshot
Go to tab Teams, find the respective team, select it and click Edit button. Go to tab Roster, select player, click edit or double click on the player.

Add a photo under Headshot and click Save.

 Note. If player is playing in a team taking part in more than one competition in the same current season, you should add player's photo in each of them. Competitions of the Current season always will be bolded on the left side of the window.